Published on
- 5 min read
How to create a blog on GitHub
Note: This is an outdated post. My blog is currently running on Astro.
Many developers run their own blogs to share notes and thoughts. These blogs are often built using Jekyll, Hugo, or Gatsby.js, and hosted with GitHub or GitLab. In this guide, I’ll show how I set up my own blog using Jekyll and GitHub.
Why GitHub
There are many reasons to use GitHub:
- GitHub Pages lets you host static sites for free.
- It has built-in support for Jekyll.
- You can update posts using
git commitandgit push. - Posts are stored in a remote repository.
- GitHub Actions can build and deploy your blog automatically.
That said, you could also use GitLab, which offers similar features.
Requirements
To build your blog, you’ll need:
- Ruby – for building and running the blog locally
- Jekyll – for blog configuration
- Markdown – for writing posts
- HTML, CSS, JavaScript – for editing layouts and adding scripts
- Git – to track changes
- GitHub – to store your repository
- GitHub Actions – to build and deploy
- GitHub Pages – to host your blog
Don’t worry — you don’t need to be an expert in all of these. For example, Ruby is only needed if you want to preview the blog locally. You can even skip Ruby and Jekyll if you’re okay with pushing changes and waiting for the site to deploy each time.
Ruby and Jekyll
Installing Ruby
Jekyll is a static site generator. You write posts in Markdown, and Jekyll turns them into static HTML pages. Since Jekyll is written in Ruby, install Ruby first. On Windows, the setup is simple — just click “Next” a few times.
Installing Jekyll
Once Ruby is installed, use Ruby’s package manager to install Jekyll:
gem install jekyll bundlerCreating a project
To create a blog project from a template:
jekyll new myblogThis will create a folder called myblog:
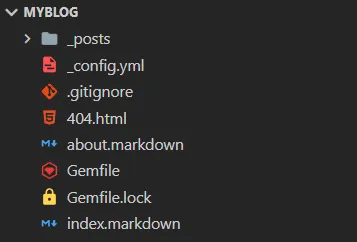
Project structure
Let’s look at the important files.
_config.yml
This is the main config file for Jekyll. The official documentation is brief, so here’s an example config from my blog:
     title: alexeyfv.blog
description: Articles about .NET, C# and much more
baseurl: ''
url: 'http://www.alexeyfv.xyz/'
theme: minima

author:
  name: © 2022 Alexey Fedorov

minima:
  skin: dark
  social_links:
    github: alexeyfv
    linkedin: alexeyfv
    telegram: alexeyfv

header_pages:
  - _pages/tags.html
  - _pages/projects.md
  - _pages/about.

include: ['_pages']
show_excerpts: true
Gemfile and Gemfile.lock
These files manage dependencies with Ruby’s Bundler. You usually don’t need to edit them.
index.markdown, about.markdown, 404.html
These are sample blog pages. You can customize them or move them into a separate _pages folder. Jekyll supports both HTML and Markdown for page content. For layout customization, check the minima theme repo.
_posts folder
This is where your blog posts go. All posts in this folder will show on the homepage.
Running the blog locally
To preview the blog:
bundle exec jekyll serveIf you see the error cannot load such file -- webrick, add this line to Gemfile:
gem "webrick", "~> 1.7"Then open your browser at http://localhost:4000/.
Blog Setup
Now you can start writing posts. The official Jekyll guide on posts is good, so I’ll just share a few extra tips here.
Tags
Jekyll doesn’t support tags out of the box, so you need to add it manually. Here’s the functionality I wanted:
- Show tags in each post
- View a list of tags
- Show post count per tag
- Filter posts by tag
My implementation is based on two articles (this one and this one) with a few changes.
Show tags in a post
Copy _layouts/post.html from the minima theme into your project, then add this inside the <header>:
     {% raw %}{% for tag in page.tags %}
<a class="post" href="{{site.baseurl}}/tag/{{tag}}">#{{tag}}</a>
{% endfor %}{% endraw %}
View all tags and count
Create a _pages/tags.html file like this:
     {% raw %}--- permalink: /tags/ layout: page title: Tags ---

<ul>
  {% assign tags = site.posts | all_tags %} {% for tag in tags %}
  <li>
    <a class="tag-link" href="{{site.baseurl}}/tag/{{tag['name']}}">
      #{{ tag['name'] }} ({{ tag['count'] }})
    </a>
  </li>
  {% endfor %}
</ul>
{% endraw %}
Then add a plugin to _plugins that counts tags:
     module Jekyll
  module TagsCounter
    def all_tags(posts)
      counts = {}

      posts.each do |post|
        post['tags'].each do |tag|
          counts[tag] ||= 0
          counts[tag] += 1
        end
      end

      counts.keys.reject(&:empty?).map do |tag|
        { 'name' => tag, 'count' => counts[tag] }
      end.sort_by { |t| -t['count'] }
    end
  end
end

Liquid::Template.register_filter(Jekyll::TagsCounter)
Filter posts by tag
Create _layouts/tag.html like this:
     {% raw %}--- layout: default ---

<h1>#{{page.tag}}</h1>
<ul>
  {% for post in site.posts %} {% if post.tags contains page.tag %}
  <li><a class="post" href="{{post.url}}">{{ post.title }}</a></li>
  {% endif %} {% endfor %}
</ul>
{% endraw %}
Then add a plugin in _plugins that generates tag pages:
     module Jekyll
  class TagPageGenerator < Generator
    safe true

    def generate(site)
      tags = site.posts.docs.flat_map { |post| post.data['tags'] || [] }.to_set
      tags.each do |tag|
        site.pages << TagPage.new(site, site.source, tag)
      end
    end
  end

  class TagPage < Page
    def initialize(site, base, tag)
      @site = site
      @base = base
      @dir  = File.join('tag', tag)
      @name = 'index.html'

      self.process(@name)
      self.read_yaml(File.join(base, '_layouts'), 'tag.html')
      self.data['tag'] = tag
      self.data['title'] = "Tag: #{tag}"
    end
  end
end
This plugin will create folders like site/tag/javascript/index.html for every tag.
Comments
Jekyll doesn’t include a comment system. There are many options (this guide lists a few). I use utterances, which is based on GitHub Issues. It’s simple to set up — just follow the steps on their site and paste the generated JS snippet at the end of _layouts/post.html.
Building and Deploying via GitHub
Once your blog is ready, you can publish it. I use GitHub Pages since it supports Jekyll natively and hosts my repo.
However, GitHub Pages has restrictions — you can’t use custom plugins directly. So you must build the blog yourself and then deploy it.
Here’s how to split it into two steps:
1. Build with GitHub Actions
Use jekyll-deploy-action. Just add a YAML file to your repo. It will create a GitHub Actions workflow that runs on every push to master, builds the site, and pushes it to gh-pages.
2. Deploy to GitHub Pages
In your repo’s Settings, go to Pages and select the gh-pages branch.
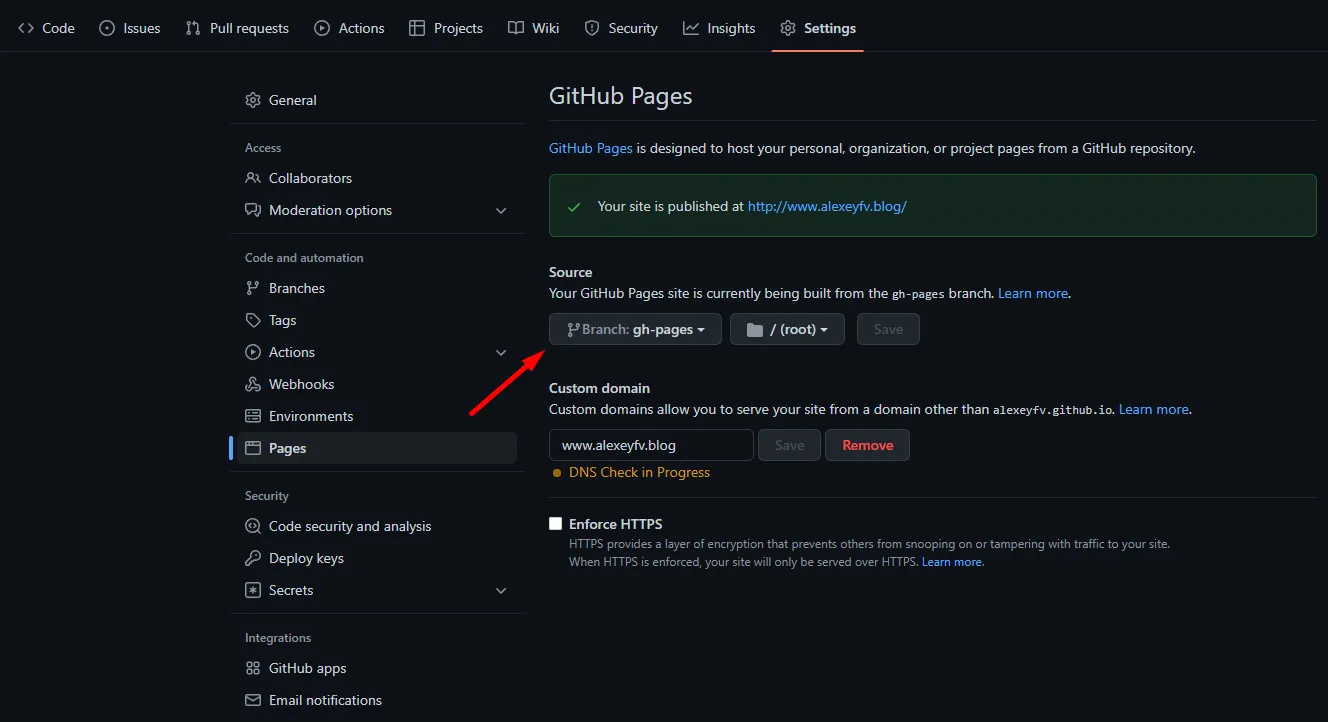
Your blog will be published at https://<username>.github.io/<projectname>/. You can also set a custom domain if you buy one from a domain provider.